
      
|
Showing posts with label BASIC. Show all posts
Showing posts with label BASIC. Show all posts
Friday, September 4, 2009
DarkGAME Studio Arrived Earlier
DarkGAME Studio arrived earlier today (Friday, before work). I thought it would take longer. Now I'm all hopped-up on iced coffee and I'm going to get crackin' with DarkBASIC! First I'm crackin' open some Amber Bock and shooting for wide-awake-buzzed.

Sunday, August 23, 2009
Just Ordered DarkBASIC
I just ordered DarkBASIC. In the past I have looked at DarkBASIC, but have refused to buy it. Not only am I cheap, I don't like updating products. But I just checked out the Game Creators website and noticed they are having what they are calling a Dark Game Studio Bonanza. So I shelled out the money. I mean, I spend more on games that I never play, so why not spend some money on something I'll tinker with for a couple years? I can't wait until it arrives.
Sunday, August 2, 2009
MkDir and VB6
On vbCity there was a forum post about using VB6 to create a folder.
Some help was had, but later there was this post:
Now, I'm no VB6 expert, but I tinker around on the Windows command line all the time and I'd like to suggest a couple of things, but first I'll show the reasons why.
First off, for those who do not know, MKDIR is a command you can use on the Windows command line to make a new directory (folder).
Open a directory in Windows Explorer and a command prompt to the same directory. For our example we will be working in C:\test

On the command line type:
MKDIR C:\test\the longest folder name in XP history
and press return.
You should see seven new folders.

This is because Windows has treated each word in our folder name as its own parameter to pass to MKDIR.
To get around this and make a folder with spaces we need to pass the entire path, including drive letter, to MKDIR. This is done by wrapping the entire path in quotes.
Go ahead and type the previous command on the command line, but this time with quotes:
MKDIR "C:\test\the longest folder name in XP history"
The result is yet another folder with our hideous-long name.

So, the answer as to why has been given--- MKDIR processes each parameter separately and parameters with spaces should be fully wrapped in quotes. (Actually, you usually only need the closing quote if there's just one parameter. The closing quote is assumed by Windows. But I'm classing that as a Windows bug instead of a useful tip)
Now for practical solutions...
First, you may want to forget about spaces in paths altogether. I have and I am happier this way.
Second, I had problems with a previous VB6 application when I used app.path in this way, but once I assigned the value of app.path to a string variable and used that variable the problem went away. I don't know why, it just did.
Third, if you need quotes in your final string (for creating the folder in VB) you may find chr(int) useful.
I hope this is useable information for someone. If you have any corrections or added information, please let me know.
____________________________________________
This post brought to you by 1554 Enlightened Black Ale
How do I create a FOLDER ONLY... ?
Sorry I have a bad memory of things, I know how to create the files in the folder but forgot how to create the FOLDER its self..
Im using App.path to get to the point of the folder... App.path & "??????"
mike
Edited by - Malan on 7/25/2009 6:18:28 AM

Some help was had, but later there was this post:
thank you for Your Help .. it got me on the right Path.... BUT
This Worked MkDir App.Path & "\DataFiles\"
BUT
This Didnt Work : MkDir App.Path & "\Data Files\"
any suggestions of why ... ?
Adding the Space between the name isnt working ?
Mike
Now, I'm no VB6 expert, but I tinker around on the Windows command line all the time and I'd like to suggest a couple of things, but first I'll show the reasons why.
First off, for those who do not know, MKDIR is a command you can use on the Windows command line to make a new directory (folder).
Open a directory in Windows Explorer and a command prompt to the same directory. For our example we will be working in C:\test

On the command line type:
MKDIR C:\test\the longest folder name in XP history
and press return.
You should see seven new folders.

This is because Windows has treated each word in our folder name as its own parameter to pass to MKDIR.
To get around this and make a folder with spaces we need to pass the entire path, including drive letter, to MKDIR. This is done by wrapping the entire path in quotes.
Go ahead and type the previous command on the command line, but this time with quotes:
MKDIR "C:\test\the longest folder name in XP history"
The result is yet another folder with our hideous-long name.

So, the answer as to why has been given--- MKDIR processes each parameter separately and parameters with spaces should be fully wrapped in quotes. (Actually, you usually only need the closing quote if there's just one parameter. The closing quote is assumed by Windows. But I'm classing that as a Windows bug instead of a useful tip)
Now for practical solutions...
First, you may want to forget about spaces in paths altogether. I have and I am happier this way.
Second, I had problems with a previous VB6 application when I used app.path in this way, but once I assigned the value of app.path to a string variable and used that variable the problem went away. I don't know why, it just did.
Third, if you need quotes in your final string (for creating the folder in VB) you may find chr(int) useful.
I hope this is useable information for someone. If you have any corrections or added information, please let me know.
____________________________________________
This post brought to you by 1554 Enlightened Black Ale
Sunday, July 19, 2009
Adding QB SUBs and FUNCTIONs in PN
One nice thing about using PN for a programming environment is how easy it is to create and use simple tools as you need them. In this article I will walk you through the creation of a programming tool that will allow you to insert a SUB or FUNCTION while working with .BAS files in PN.
Open a new document in PN and type (or copy and paste) the following text into the file:
Save this as subShop.bat in your QB install folder. This file inserts a SUB or FUNCTION into whatever BASIC code you are working on.
To use it we will have to associate it with a tool in PN.
Press Ctrl+N to open a new document. Save this document anywhere on your computer as BLT.BAS.
Click Tools>Options and then select Tools and click the Add button. Make your new tool look like this:
 On the Console I/O tab, make sure the first two checkboxes are NOT checked. Click OK and then OK again.
In your empty document write the line:
PRINT "I love ";
And then select Tools>Add SUB or FUNCTION.
Into the command prompt that appears type SUB
 and press Enter.
For the next prompt enter BLT
 and press Enter.
At the next prompt type BACON$, LETTUCE$, TOMATO$
 and press Enter.
Inside the SUB, in place of the comment line, type this code:
PRINT BACON$; LETTUCE$; TOMATO$;
Your code should now look like this:
 After your first PRINT command type the following lines:
CALL BLT("BACON, ", "LETTUCE, ", " and TOMATO ")
PRINT "sandwiches!"
Your complete code should now look like this:
Now execute/interpret your code (F5 if you have been following the tutorials). You should see a prompt like this:
 When you press a key to continue, you should see your code in the QB IDE.
Hopefully this tutorial has shown how easy it can be to create custom tools for PN.
Open a new document in PN and type (or copy and paste) the following text into the file:
@ECHO OFF
:About
::      O--------------------------------------------------------------O
::      |subShop.bat helps you create QB SUBs and FUNCTIONs in Crimson |
::      |           Editor. Pass in your source file as %1.            |
::      |                                                              |
::      |            This file was created by Jason Bales              |
::      |                   gamerplusplus@gmail.com                    |
::      |                 http://gamerpp.blogspot.com/                 |
::      O--------------------------------------------------------------O

CLS
SETLOCAL
PROMPT
COLOR 47
TITLE WELCOME TO THE SUB SHOP!!

:: Are we to make a Sub or a Function?
SET /p subOrFunction="Are we to make a Sub or a Function?: "
CLS

:: What is the name of the Sub or Function?
SET /p name="What will we call it?: "
CLS

:: What are we passing in?
SET /p parameters="What are we passing in?: "

:: Simple choice
IF %subOrFunction% == SUB GOTO SUB
IF %subOrFunction% == sub GOTO SUB
IF %subOrFunction% == Sub GOTO SUB
IF %subOrFunction% == SUb GOTO SUB
IF %subOrFunction% == suB GOTO SUB
IF %subOrFunction% == sUB GOTO SUB
IF %subOrFunction% == sUb GOTO SUB

REM Notice you only need to type SUB if you want a SUB.
REM Any other input creates a FUNCTION.

:: Write a FUNCTION
> SCRATCH.TXT ECHO DECLARE FUNCTION %name% (%parameters%)
>>SCRATCH.TXT TYPE %1
>>SCRATCH.TXT ECHO.
>>SCRATCH.TXT ECHO ' ____________________
>>SCRATCH.TXT ECHO FUNCTION %name% (%parameters%)
>>SCRATCH.TXT ECHO    ' Write your code here
>>SCRATCH.TXT ECHO %name% = ' Make sure the function returns something
>>SCRATCH.TXT ECHO END FUNCTION

> %1 TYPE SCRATCH.TXT
GOTO FIN

:: Write a SUB
:SUB
> SCRATCH.TXT ECHO DECLARE SUB %name% (%parameters%)
>>SCRATCH.TXT TYPE %1
>>SCRATCH.TXT ECHO.
>>SCRATCH.TXT ECHO ' ____________________
>>SCRATCH.TXT ECHO SUB %name% (%parameters%)
>>SCRATCH.TXT ECHO    ' Write your code here
>>SCRATCH.TXT ECHO END SUB

> %1 TYPE SCRATCH.TXT

:FIN
DEL SCRATCH.TXT
ENDLOCAL
Save this as subShop.bat in your QB install folder. This file inserts a SUB or FUNCTION into whatever BASIC code you are working on.
To use it we will have to associate it with a tool in PN.
Press Ctrl+N to open a new document. Save this document anywhere on your computer as BLT.BAS.
Click Tools>Options and then select Tools and click the Add button. Make your new tool look like this:
 On the Console I/O tab, make sure the first two checkboxes are NOT checked. Click OK and then OK again.
In your empty document write the line:
PRINT "I love ";
And then select Tools>Add SUB or FUNCTION.
Into the command prompt that appears type SUB
 and press Enter.
For the next prompt enter BLT
 and press Enter.
At the next prompt type BACON$, LETTUCE$, TOMATO$
 and press Enter.
Inside the SUB, in place of the comment line, type this code:
PRINT BACON$; LETTUCE$; TOMATO$;
Your code should now look like this:
 After your first PRINT command type the following lines:
CALL BLT("BACON, ", "LETTUCE, ", " and TOMATO ")
PRINT "sandwiches!"
Your complete code should now look like this:
DECLARE SUB BLT (BACON$, LETTUCE$, TOMATO$)

PRINT "I love ";

CALL BLT("BACON, ", "LETTUCE, ", " and TOMATO ")

PRINT "sandwiches!"

' ____________________
SUB BLT (BACON$, LETTUCE$, TOMATO$)
  PRINT BACON$; LETTUCE$; TOMATO$;
END SUB
Now execute/interpret your code (F5 if you have been following the tutorials). You should see a prompt like this:
 When you press a key to continue, you should see your code in the QB IDE.
Hopefully this tutorial has shown how easy it can be to create custom tools for PN.
Tuesday, May 26, 2009
Two IDE's are Better Than One
In my last article I showed how to use Programmer's Notepad with BC.exe (the QuickBASIC compiler). Some people might have gotten the impression I was trying to do away with the QuickBASIC IDE. That's just not true! I have chosen to see QuickBASIC as a programming language that happens to have an IDE. The QB IDE has a built-in help system and advanced debugging tools (tools that do not work in WindowsXP). It also has a cumbersome text editor that is difficult or impossible to use on many current computers. This is especially true for my laptop.
Luckily, the QuickBASIC IDE can be set to save and open QB projects as plain text. These plain text files can be opened, modified, and saved by modern text editors. Using a combination of QB.EXE and modern text editors, working in tandem, you can significantly increase productivity on newer computers. This is especially true for large, multi-file QB projects. Then there are advantages in terms of memory and performance, but I'll get into that some other day.
The previous article was an introduction to using Programmer's Notepad(PN) along with BC.EXE. In this article I will introduce the idea of using PN with QB.EXE.
With a BASIC file open in QB.EXE, select File>Save As
 A new window will open
 In the Format section, select the option marked Text - Readable by Other Programs and click OK. Save your BASIC file.
In PN, you can now open the very same BASIC file for editing.
There are many differences between the QB IDE and PN. PN can make organizing, editing, and compiling multifile QB projects easier. You can also have each file of a multiple module program open in its own tab. There are also some advanced features, including user tools and macros written in Python, which allow you to do things in PN that you cannot do in QB.EXE.
PN will not check your code as you write it the way QB does (I'll work on that later), but PN has autocomplete functionality. Just start typing and you will see a list of words that you might use.
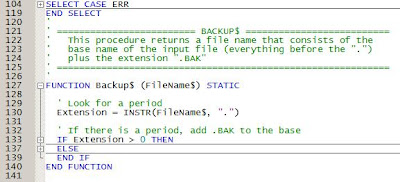
Another cool feature is code folding. To get an idea of what code folding is, look at this code:
 And now look at the same code after it's folded:
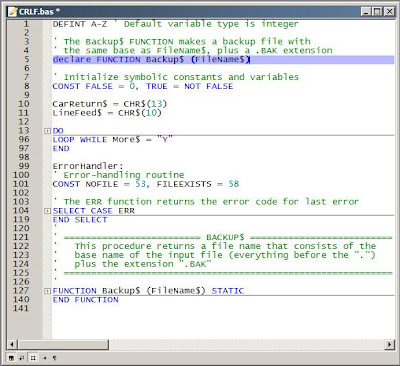 You see here a program with 141 lines of code can fit in a small space if it's all folded up. Each section of code can be folded or unfolded or all code can be folded or unfolded.
 You may also notice that as you type, your text changes color. This is called syntax highlighting. It makes reading code easier. The words recognized by autocomplete and syntax highlighting can be adapted to suit your needs.
If you look around PN, you will find many more useful features. There are windows for projects, tags, and scripts. PN also allows users to create macros and user tools. Of all these features, we will just be looking at user tools in this article.
With your BASIC file open in PN, select Tools>Options and then make sure Tools is selected on the left. Press the Add button. Make the next window that opens look like this:
 Make sure the path to QB.EXE is correct. Press OK and then OK again. Press your hotkeys to use the tool. You should now see your code opened in the QB IDE. You can use all the tools of the QB IDE (if you are on an older system) and save the file. When you go back to PN you will see this popup:
 If you want to keep the changes you made to your code in the QB IDE, choose Yes. Your updated code will appear in PN.
If you would like to have QB.EXE interpret the code you are working on in PN, you can do that as well.
With your BASIC file open in PN, select Tools>Options and then make sure Tools is selected on the left. Press the Add button. Make the next window that opens look like this:

Again, make sure the path to QB.EXE is correct on your computer. Press OK and then OK again. Press your hotkeys to use the tool. You should now see your code interpreted by the QB IDE. If there are errors in your code, the IDE will let you know with a message like this:
 If there are no errors your code will execute. When finished, your code will be opened in the IDE.
NOTE: If you do not want your interpreted program to exit to the QB IDE, make your code end with the keyword SYSTEM.
Luckily, the QuickBASIC IDE can be set to save and open QB projects as plain text. These plain text files can be opened, modified, and saved by modern text editors. Using a combination of QB.EXE and modern text editors, working in tandem, you can significantly increase productivity on newer computers. This is especially true for large, multi-file QB projects. Then there are advantages in terms of memory and performance, but I'll get into that some other day.
The previous article was an introduction to using Programmer's Notepad(PN) along with BC.EXE. In this article I will introduce the idea of using PN with QB.EXE.
With a BASIC file open in QB.EXE, select File>Save As
 A new window will open
 In the Format section, select the option marked Text - Readable by Other Programs and click OK. Save your BASIC file.
In PN, you can now open the very same BASIC file for editing.
There are many differences between the QB IDE and PN. PN can make organizing, editing, and compiling multifile QB projects easier. You can also have each file of a multiple module program open in its own tab. There are also some advanced features, including user tools and macros written in Python, which allow you to do things in PN that you cannot do in QB.EXE.
PN will not check your code as you write it the way QB does (I'll work on that later), but PN has autocomplete functionality.
 Just start typing and you will see a list of words that you might use.
Another cool feature is code folding. To get an idea of what code folding is, look at this code:
 And now look at the same code after it's folded:
 You see here a program with 141 lines of code can fit in a small space if it's all folded up. Each section of code can be folded or unfolded or all code can be folded or unfolded.
 You may also notice that as you type, your text changes color. This is called syntax highlighting. It makes reading code easier. The words recognized by autocomplete and syntax highlighting can be adapted to suit your needs.
If you look around PN, you will find many more useful features. There are windows for projects, tags, and scripts. PN also allows users to create macros and user tools. Of all these features, we will just be looking at user tools in this article.
With your BASIC file open in PN, select Tools>Options and then make sure Tools is selected on the left. Press the Add button. Make the next window that opens look like this:
 Make sure the path to QB.EXE is correct. Press OK and then OK again. Press your hotkeys to use the tool. You should now see your code opened in the QB IDE. You can use all the tools of the QB IDE (if you are on an older system) and save the file. When you go back to PN you will see this popup:
 If you want to keep the changes you made to your code in the QB IDE, choose Yes. Your updated code will appear in PN.
If you would like to have QB.EXE interpret the code you are working on in PN, you can do that as well.
With your BASIC file open in PN, select Tools>Options and then make sure Tools is selected on the left. Press the Add button. Make the next window that opens look like this:

Again, make sure the path to QB.EXE is correct on your computer. Press OK and then OK again. Press your hotkeys to use the tool. You should now see your code interpreted by the QB IDE. If there are errors in your code, the IDE will let you know with a message like this:
 If there are no errors your code will execute. When finished, your code will be opened in the IDE.
NOTE: If you do not want your interpreted program to exit to the QB IDE, make your code end with the keyword SYSTEM.
Tuesday, May 19, 2009
Compiling and Running QB Programs from Inside Programmer's Notepad
I previously wrote how I had been inspired to use the methods found in Issue #2 of QB Express to liberate QB from DOS. Since that time I have stopped thinking of liberating QB and started thinking of ways to enhance the QB experience. In this article I describe how I write, compile, and run QB programs within a WindowsXP environment.
The first thing you need to decide on is what text editor you want to use as a programming environment. For the last few years I have used Crimson Editor almost exclusively, but a few days ago I switched to Programmer's Notepad. Both text editors can be configured to do everything I describe in this article. Each editor has features not found in the other. It is up to you to choose your programming environment, but for the sake of this article I will be using Programmer's Notepad (PN).
In PN, create a text file and type the following line of code:
Press Ctrl+N to create a new document. Type (or copy and paste) the following text into the new file:
This batch file creates another batch file in your .BAS file's directory. This new batch file will be used to compile your code.
Before we can use this batch file we will need to create a tool to pass our file name and path to compileMaker.bat. In PN, click Tools>Options. A new window should pop open. In this, the Options window, select Tools and then click the Add button you see on the right.
 Yet another window will open.
 Make the window look like this:
 Make sure that the Command section of this tool contains the full path, file name, and extension to compileMaker.bat. You can click the button to the right of the field to browse to the file. You can choose whatever shortcut keys you like.
In this window click the Console I/O tab and make sure the Capture output checkbox is un-checked.
 Now click on OK in the tool properties window and then the OK in the Options window.
If you click on Tools you should now see your new tool. Every time you create a tool for .BAS files, it will appear here.
 With our hello.bas file selected in PN, run the Create compile%1.BAT tool. A console window should pop open:
 If you needed to send command-line options to BC, this is where you would type them. Since hello.bas only has a print statement, just press return.
Running this tool creates a batch file in the same directory as our code. If we run that new batch file we can compile our code into an executable. One way of running batch files is to navigate in Windows explorer to the file and double click it. Another way of running the file is to set up a user tool.
In PN, click Tools>Options. Click OK once you've made the properties window look something like this:
 As with the previous tool, select the Console I/O tab and make sure the capture output option is un-selected.
Those of you actually following along will know what's coming next...
In PN, press Ctrl+N and type the following text:
Save This file in your QB install folder as "batchCompile.bat". Make sure the path to compileMaker.bat is correct for your computer.
Now run your new tool (find it in the Tools menu or use your hotkeys). If all went well you should see a prompt like this:
 What this means is you just compiled a QuickBASIC program!
To run the program, we will make yet another tool. In PN, click Tools>Options and make the options window look like this:
 Make sure the command portion of the tool points to your QB install folder. Again, on the Console I/O tab, de-select the capture output option. Click OK then OK again.
Back in PN, press Ctrl+N and enter the following text:
In PN, select hello.bas again and use your newest tool to run your compiled program:

The first thing you need to decide on is what text editor you want to use as a programming environment. For the last few years I have used Crimson Editor almost exclusively, but a few days ago I switched to Programmer's Notepad. Both text editors can be configured to do everything I describe in this article. Each editor has features not found in the other. It is up to you to choose your programming environment, but for the sake of this article I will be using Programmer's Notepad (PN).
In PN, create a text file and type the following line of code:
PRINT "Hello, Windows!"Save this as "hello.bas" anywhere on your computer. Now we have created QuickBASIC source code in our editor, but what can we do with it?
Press Ctrl+N to create a new document. Type (or copy and paste) the following text into the new file:
@ECHO OFFSave this file as "compileMaker.bat". I recommend saving it to your QB install folder. Make sure you change the paths in this batch file so they are correct on your system.
:ABOUT
:: O---------------------------------------------O
:: |compileMaker.bat v1.0 generates compile%1.bat|
:: |which can then be used to compile your |
:: |QuickBasic project. |
:: | |
:: |This batch file was created by Jason |
:: |Bales (gamerplusplus@gmail.com) |
:: |http://gamerpp.blogspot.com/ |
:: O---------------------------------------------O
SETLOCAL
PROMPT
TITLE COMPILE MAKER IS NOW RUNNING
COLOR 1F
:VARIABLES
REM %1 IS YOUR BASIC FILE NAME
REM %optiones% SHOULD BE YOUR ADDED COMMAND-LINE COMPILE OPTIONS LIKE /X/E
REM Make sure to change all paths so they point to
REM the right place on your computer
SET BC=C:\QBasic\BC.EXE
SET LINK=C:\QBasic\LINK.EXE
SET BCOM=C:\QBasic\BCOM45.LIB
:: get command-line options
CLS
SET /p optiones="Enter any special command-line options: "
:makeIt
> COMPILE%1.BAT ECHO @ECHO OFF
>>COMPILE%1.BAT ECHO REM Run this batch file to compile your .bas file
>>COMPILE%1.BAT ECHO.
>>COMPILE%1.BAT ECHO :: Compile and Link
>>COMPILE%1.BAT ECHO CALL %BC% %1.bas %optiones%/o;
>>COMPILE%1.BAT ECHO CALL %LINK% %1.OBJ, %1.EXE, , %BCOM%
>>COMPILE%1.BAT ECHO.
>>COMPILE%1.BAT ECHO :: Do a little cleanup
>>COMPILE%1.BAT ECHO DEL %1.OBJ
>>COMPILE%1.BAT ECHO DEL %1.MAP
ENDLOCAL
This batch file creates another batch file in your .BAS file's directory. This new batch file will be used to compile your code.
Before we can use this batch file we will need to create a tool to pass our file name and path to compileMaker.bat. In PN, click Tools>Options. A new window should pop open. In this, the Options window, select Tools and then click the Add button you see on the right.
 Yet another window will open.
 Make the window look like this:
 Make sure that the Command section of this tool contains the full path, file name, and extension to compileMaker.bat. You can click the button to the right of the field to browse to the file. You can choose whatever shortcut keys you like.
In this window click the Console I/O tab and make sure the Capture output checkbox is un-checked.
 Now click on OK in the tool properties window and then the OK in the Options window.
If you click on Tools you should now see your new tool. Every time you create a tool for .BAS files, it will appear here.
 With our hello.bas file selected in PN, run the Create compile%1.BAT tool. A console window should pop open:
 If you needed to send command-line options to BC, this is where you would type them. Since hello.bas only has a print statement, just press return.
Running this tool creates a batch file in the same directory as our code. If we run that new batch file we can compile our code into an executable. One way of running batch files is to navigate in Windows explorer to the file and double click it. Another way of running the file is to set up a user tool.
In PN, click Tools>Options. Click OK once you've made the properties window look something like this:
 As with the previous tool, select the Console I/O tab and make sure the capture output option is un-selected.
Those of you actually following along will know what's coming next...
In PN, press Ctrl+N and type the following text:
@ECHO OFF

REM Pass the file title into this batch to compile.

:: If there's no COMPILE%1.BAT...
:: Make the COMPILE%1.BAT
IF NOT EXIST COMPILE%1.BAT CALL C:\QBasic\compileMaker.bat %1

:: Compile our .BAS file
CALL COMPILE%1.bat

PAUSE
Save This file in your QB install folder as "batchCompile.bat". Make sure the path to compileMaker.bat is correct for your computer.
Now run your new tool (find it in the Tools menu or use your hotkeys). If all went well you should see a prompt like this:
 What this means is you just compiled a QuickBASIC program!
To run the program, we will make yet another tool. In PN, click Tools>Options and make the options window look like this:
 Make sure the command portion of the tool points to your QB install folder. Again, on the Console I/O tab, de-select the capture output option. Click OK then OK again.
Back in PN, press Ctrl+N and enter the following text:
@ECHO OFFSave this as CommandLineExecutor.bat in your QB install folder.
CLS
PROMPT
COLOR 1F
TITLE "%~N1" IS NOW RUNNING...
REM Use this simple batch to run command-line programs
REM from explorer and programming editors.
REM Pass into it the full path with file name and extension.
CALL %1
ECHO.
ECHO.
PAUSE
In PN, select hello.bas again and use your newest tool to run your compiled program:

Monday, March 23, 2009
QB45 Batch Compiles
The last couple posts have been about using Crimson Editor as a QB45 programming environment. I've run into a problem. Different QB programs require different command-line options to compile. For instance, when I try to compile an example program named CRLF.BAS, Crimson gives me the following output:
---------------------------------------------
0084 0012 ON ERROR GOTO ErrorHandler ' Turn on error trapping.
^ Missing On Error (/E) option
00A9 001A ON ERROR GOTO 0 ' Turn off error trapping.
^ Missing On Error (/E) option
0278 002A RESUME
^ Missing Resume Next (/X) option
02A0 002E RESUME
^ Missing Resume Next (/X) option
02B6 002E ON ERROR GOTO 0
^ Missing On Error (/E) option
---------------------------------------------
This is because the default makefile generated by Crimson Editor the way I have it set up now is missing two command-line options that are needed to make it compile.
So, when you come to a QB project like this, what do you do? I could write a separate utility to help choose command-line options (I'll probably get around to it some day). You could give up Crimson and open the project in QB. OR you could write a simple batch file. The same code that produced the errors above can be compiled by running this code as a batch file in the CRLF.BAS folder:
---------------------------------------------
call C:\QBasic\BC.EXE CRLF.bas /E/X/o;
call C:\QBasic\LINK.EXE CRLF.obj, scratch\CRLF2.exe, , C:\QBasic\BCOM45.LIB ;
---------------------------------------------
Now CRFL.BAS will compile with three command-line options and run perfectly. I even changed the output folder and the name of the output file.
---------------------------------------------
0084 0012 ON ERROR GOTO ErrorHandler ' Turn on error trapping.
^ Missing On Error (/E) option
00A9 001A ON ERROR GOTO 0 ' Turn off error trapping.
^ Missing On Error (/E) option
0278 002A RESUME
^ Missing Resume Next (/X) option
02A0 002E RESUME
^ Missing Resume Next (/X) option
02B6 002E ON ERROR GOTO 0
^ Missing On Error (/E) option
---------------------------------------------
This is because the default makefile generated by Crimson Editor the way I have it set up now is missing two command-line options that are needed to make it compile.
So, when you come to a QB project like this, what do you do? I could write a separate utility to help choose command-line options (I'll probably get around to it some day). You could give up Crimson and open the project in QB. OR you could write a simple batch file. The same code that produced the errors above can be compiled by running this code as a batch file in the CRLF.BAS folder:
---------------------------------------------
call C:\QBasic\BC.EXE CRLF.bas /E/X/o;
call C:\QBasic\LINK.EXE CRLF.obj, scratch\CRLF2.exe, , C:\QBasic\BCOM45.LIB ;
---------------------------------------------
Now CRFL.BAS will compile with three command-line options and run perfectly. I even changed the output folder and the name of the output file.
Sunday, March 22, 2009
Video Showing QB in Crimson
In my last post I showed how to set up Crimson Editor as a QB45 programming environment. Here's a little video showing how it looks.
Saturday, March 21, 2009
Working with QB45 in Crimson Editor
In the summer of 2004 I was tinkering with different scripting and programming languages. It was like a hobby. Over a weekend I'd figure out how to write, compile, and run programs from the command prompt or within Crimson Editor. After I understood how compilers, linkers, and interpreters work I became confident I could use Crimson Editor to write and run programs in any programming language. C and C++, no sweat! Java, simple. Python? Yep.
Then I got the bright idea to write and compile Microsoft QuickBasic from Crimson. I figured out how to link and compile .bas files on the command line and then went to the task of doing it from Crimson. This was more difficult than anything I'd ever done with Crimson. Night after night I would write and re-write batch files and Crimson toolsets. Weeks rolled on and still I was unable to compile QB programs in Crimson.
This changed suddenly one day in September or October when I read an article in QB Express, an online QB community magazine. In Issue #2 of QB Express there is an article titled Liberate QB from DOS by Martin Rampersad. In the article Mr. Rampersad shows how you can use GNU Make to compile .bas files by right clicking on a folder and choosing an option. I never did get the registry file to work as it is demonstrated in the article. I did, however, do something cooler.
By the end of this article you will be able to write, compile, and run QB45 programs from the comfort of Crimson Editor!
I assume you have QB45 and Crimson Editor installed on your computer and I assume you know what paths and directories are. Once you have QB45, Crimson, and know what paths and directories are, please proceed with the article.
One more quick note, all of the tools, programs, and scripts in this article work on my laptop running WindowsXP SP2, but I do not guarantee they will work perfectly on your computer. You take full responsiblility for anything you do on your computer.
Before you can get started you need to download a small utility known as make. I got my version of make from THIS sourceforge page. You could go there, download the archive, extract the archive, find make.exe, copy make.exe to your QB45 install folder, navigate back to the archive and extracted files and delete everything you didn't use... OR you could click HERE and download a .zip file with make.exe and all the batch files described in this article. Just download the .zip and extract all the files to your QB45 folder.
OK, now we're ready! Open Crimson and press Ctrl+n. Type the following text into this file:
Save this file as "CommandLineExecutor.bat" in your QB45 install directory. Make sure to use quotes so the file gets saved with the proper file extension.
CommandLineExecutor.bat will be used to run the programs you compile in Crimson.
Press Ctrl+n and enter the following text:
Save this file as "makeMaker.bat" in your QB45 install directory. This batch file will make the files that are used by QB45 and GNU make to create executables. If you installed QB anywhere other than C:\QBasic, you should change the batch file to match your QB install directory.
Press Ctrl+n and enter the following text:
Save this file as "shellmake.bat" in you QB45 folder. This file makes the magic happen. You pass it the project directory and the name of the .bas file you are working on and it makes a nice, neat executable. As with the last batch file, you may need to change the paths to point to makeMaker.bat and make.exe wherever they are at on your system.
Press Ctrl+n one last time and enter this text:
Save this file as "CompileAndRun.bat" in your QB45 directory. This batch file will compile and run whatever .bas file you are working on. Once again, you may need to change the paths to match your system.
These batch files will just sit there in your QB45 directory unless you tell Crimson to do something with them. That means we need to make a toolset. In Crimson click Tools>Conf. User Tools...
A new window should pop open. Click on the second slot for user tools and fill in the information until your first tool looks like this picture. Make sure the Command section has the full path to makeMaker.bat on your computer. Also make sure to check "save before execute" and "capture output". This tool works with Crimson to generate a makefile in the directory you save your .bas file to. Click on the third tool slot and make it look like this picture, again making sure you fill in the proper path to make.exe for the command portion.
Click the fifth slot and make it look like this:
For the final tool click on the ninth tool slot and enter the following information:
Make sure the argument is "$(FileDir)" $(FileTitle) with a space between each argument.
Click the Save Tools button and save the toolset. Click Apply and then OK.
Now you are ready to test your tools. Press Ctrl+n and type the following code:
Save this as "Hello.bas" into a new directory anywhere on your computer.
Now press Ctrl+2. You should see a new window pop open in Crimson and you should see text appear in the window. If all went well the last line of text in the new window should read "Terminated with exit code 0".
Press Ctrl+3. You will see new text in Crimson's output window. You are looking for zero errors, zero warnings and exit code zero. Zero is good.
Press Ctrl+5. You should see the program you just compiled pop open in a new command prompt.
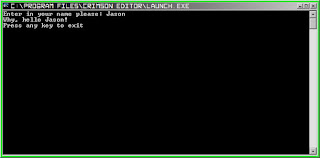 If you press Ctrl+9 you will produce a new makefile, compile, and execute in one step.
This article was meant as an introduction to using QB with Crimson Editor. With ingenuety and time you can adapt and expand the toolset to suit your needs.
Then I got the bright idea to write and compile Microsoft QuickBasic from Crimson. I figured out how to link and compile .bas files on the command line and then went to the task of doing it from Crimson. This was more difficult than anything I'd ever done with Crimson. Night after night I would write and re-write batch files and Crimson toolsets. Weeks rolled on and still I was unable to compile QB programs in Crimson.
This changed suddenly one day in September or October when I read an article in QB Express, an online QB community magazine. In Issue #2 of QB Express there is an article titled Liberate QB from DOS by Martin Rampersad. In the article Mr. Rampersad shows how you can use GNU Make to compile .bas files by right clicking on a folder and choosing an option. I never did get the registry file to work as it is demonstrated in the article. I did, however, do something cooler.
By the end of this article you will be able to write, compile, and run QB45 programs from the comfort of Crimson Editor!
I assume you have QB45 and Crimson Editor installed on your computer and I assume you know what paths and directories are. Once you have QB45, Crimson, and know what paths and directories are, please proceed with the article.
One more quick note, all of the tools, programs, and scripts in this article work on my laptop running WindowsXP SP2, but I do not guarantee they will work perfectly on your computer. You take full responsiblility for anything you do on your computer.
Before you can get started you need to download a small utility known as make. I got my version of make from THIS sourceforge page. You could go there, download the archive, extract the archive, find make.exe, copy make.exe to your QB45 install folder, navigate back to the archive and extracted files and delete everything you didn't use... OR you could click HERE and download a .zip file with make.exe and all the batch files described in this article. Just download the .zip and extract all the files to your QB45 folder.
OK, now we're ready! Open Crimson and press Ctrl+n. Type the following text into this file:
@ECHO OFF
REM Use this simple batch to run command-line programs
REM from explorer and Crimson Editor.
REM Pass into it the full path with file name and extension.

"%1"
Save this file as "CommandLineExecutor.bat" in your QB45 install directory. Make sure to use quotes so the file gets saved with the proper file extension.
CommandLineExecutor.bat will be used to run the programs you compile in Crimson.
Press Ctrl+n and enter the following text:
@ECHO OFF

:: Display "about"
ECHO makeMaker.bat
ECHO generates makefiles for use
ECHO with QuickBasic
ECHO.
ECHO Written by Jason Bales
ECHO A.K.A. Gamer++
ECHO http://gamerpp.blogspot.com/
ECHO gamerplusplus@gmail.com
ECHO.
ECHO Writing paths...
REM Change these three paths if
REM your QB45 install directory
REM isn't C:\QBasic
> makefile ECHO BC=C:\QBasic\BC.EXE
>>makefile ECHO LINK=C:\QBasic\LINK.EXE
>>makefile ECHO BCOM=C:\QBasic\BCOM45.LIB
>>makefile ECHO.
>>makefile ECHO all: %1.exe
>>makefile ECHO.
>>makefile ECHO %%.exe: %%.obj
>>makefile ECHO $(LINK) $^<, $@, , $^(BCOM^); >>makefile ECHO.
>>makefile ECHO %%.obj: %%.bas
>>makefile ECHO $(BC) $^< /o; >>makefile ECHO.
ECHO Your makefile is ready now
Save this file as "makeMaker.bat" in your QB45 install directory. This batch file will make the files that are used by QB45 and GNU make to create executables. If you installed QB anywhere other than C:\QBasic, you should change the batch file to match your QB install directory.
Press Ctrl+n and enter the following text:
@echo off

:: Display "about"
ECHO GNU Make Shell Extension
ECHO uses GNU Make to compile
ECHO with QuickBasic
ECHO.
ECHO Written by Jason Bales
ECHO A.K.A. Gamer++
ECHO http://gamerpp.blogspot.com/
ECHO gamerplusplus@gmail.com
ECHO based on the the file given
ECHO by Martin Rampersad in
ECHO QB Express Issue #2 ~ September 15, 2004
ECHO http://www.petesqbsite.com/sections/express/issue2/index.html#liberate
ECHO.
ECHO %1 is the project directory
ECHO %2 is the .bas file
:: Make the makefile
REM Change this path to point to makeMaker.bat
CALL "C:\QBasic\makeMaker.bat" %~n2
:: Call GNU make
REM Change this path to point to make.exe on your computer
CALL "C:\QBasic\make.exe"
REM Pause on Error
if errorlevel = 1 pause
Save this file as "shellmake.bat" in you QB45 folder. This file makes the magic happen. You pass it the project directory and the name of the .bas file you are working on and it makes a nice, neat executable. As with the last batch file, you may need to change the paths to point to makeMaker.bat and make.exe wherever they are at on your system.
Press Ctrl+n one last time and enter this text:
@ECHO OFF

CALL C:\QBasic\shellmake.bat %1 %2
CALL C:\QBasic\CommandLineExecutor.bat %2

PAUSE
Save this file as "CompileAndRun.bat" in your QB45 directory. This batch file will compile and run whatever .bas file you are working on. Once again, you may need to change the paths to match your system.
These batch files will just sit there in your QB45 directory unless you tell Crimson to do something with them. That means we need to make a toolset. In Crimson click Tools>Conf. User Tools...

A new window should pop open. Click on the second slot for user tools and fill in the information until your first tool looks like this picture. Make sure the Command section has the full path to makeMaker.bat on your computer. Also make sure to check "save before execute" and "capture output". This tool works with Crimson to generate a makefile in the directory you save your .bas file to.
 Click on the third tool slot and make it look like this picture, again making sure you fill in the proper path to make.exe for the command portion.
Click the fifth slot and make it look like this:

For the final tool click on the ninth tool slot and enter the following information:

Make sure the argument is "$(FileDir)" $(FileTitle) with a space between each argument.
Click the Save Tools button and save the toolset. Click Apply and then OK.
Now you are ready to test your tools. Press Ctrl+n and type the following code:
INPUT "Enter in your name please: ", name$
PRINT "Why, hello "; name$; "!"

END
Save this as "Hello.bas" into a new directory anywhere on your computer.
Now press Ctrl+2. You should see a new window pop open in Crimson and you should see text appear in the window. If all went well the last line of text in the new window should read "Terminated with exit code 0".
Press Ctrl+3. You will see new text in Crimson's output window. You are looking for zero errors, zero warnings and exit code zero. Zero is good.
Press Ctrl+5. You should see the program you just compiled pop open in a new command prompt.
 If you press Ctrl+9 you will produce a new makefile, compile, and execute in one step.
This article was meant as an introduction to using QB with Crimson Editor. With ingenuety and time you can adapt and expand the toolset to suit your needs.
Monday, March 10, 2008
Ultima IV in DarkBasic
Here is probably the coolest thing I've seen made with DarkBasic. It's a remake of Ultima IV. It is complete with source code and kicks ass!
Ultima IV Virtue of Humility
Ultima IV Virtue of Humility
Subscribe to:
Posts (Atom)